Sealed Crawl Space Encapsulation in Raleigh: Protect Your Home from Moisture, Mold & Energy Loss
April 8th, 2026When damp smells rise from your floors, insulation sags, or your heating bills creep upward, the problem may lie beneath your feet—in the crawl space. Drainage & Waterproofing Solutions has been helping Raleigh, Garner, and Wake County homeowners seal and protect their crawl spaces since 2010, delivering locally owned, family‑operated service that stops moisture at its source. This guide explains everything you need to know about sealed crawl space encapsulation: how it works, warning signs, the installation process, timelines, cost ranges, warranties, long‑term benefits, and real‑world stories from Triangle homeowners.
Why Choose Drainage & Waterproofing Solutions for Your Sealed Crawl Space?
- 20+ years of local experience – We’ve encapsulated hundreds of crawl spaces across central NC, tailoring our methods to the region’s clay soils, high humidity, and seasonal rainfall.
- BBB‑accredited with A+ rating – Our commitment to quality workmanship and customer satisfaction is verified by the Better Business Bureau.
- Family‑owned & operated – You’ll work directly with the owners who stand behind every project with a personal guarantee of satisfaction.
- Specialized expertise – We focus exclusively on drainage and waterproofing, ensuring deep knowledge of vapor barriers, dehumidification, vent sealing, and crawl‑space insulation.
- No‑surprise pricing – We provide detailed, itemized estimates before any work begins, so you know exactly what you’re paying for.
These qualities reinforce our core messaging: “locally owned,” “family‑operated since 2010,” and “peace of mind.”
What Is a Sealed (Encapsulated) Crawl Space & How Does It Work?
Crawl space encapsulation is the process of sealing off the crawl space from the earth and outside air to control moisture, improve indoor air quality, and increase energy efficiency. Rather than simply laying a thin vapor barrier, a full encapsulation system treats the crawl space as a semi‑conditioned part of your home
Core Components of a Professional Encapsulation
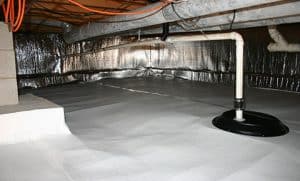
- Heavy‑duty vapor barrier – Typically a 10‑mil to 20‑mil polyethylene liner that covers the floor and extends up the foundation walls, sealed at seams and edges.
- Sealed vents and access points – Foundation vents are closed with airtight covers; doors or hatches are gasketed to prevent unconditioned air infiltration.
- Insulation (optional) – Rigid foam or spray‑applied insulation can be added to foundation walls or rim joists to improve thermal performance.
- Dehumidification system – A properly sized, Energy Star‑rated crawl‑space dehumidifier maintains relative humidity between 45‑55%, preventing mold growth and wood rot.
- Condensate pump or gravity drain – Removes water collected by the dehumidifier, directing it to a sump pump, floor drain, or exterior discharge point.
- Termite‑treated wood (if needed) – In termite‑prone areas, pressure‑treated or borate‑treated wood protects structural elements.
How Encapsulation Protects Your Home
- Moisture barrier – The vapor barrier stops ground moisture from evaporating into the crawl space air.
- Air sealing – Closed vents and sealed access points prevent humid outdoor air from entering, reducing the load on your HVAC system.
- Humidity control – The dehumidifier actively removes moisture, keeping the crawl space dry and inhibiting mold, mildew, and wood‑destroying fungi.
- Thermal break – Insulated walls and a sealed envelope reduce heat loss in winter and heat gain in summer, lowering energy bills.
- Pest deterrent – A sealed, dry crawl space is less attractive to rodents, termites, and other pests that thrive in damp environments.
By addressing moisture at its source, encapsulation helps prevent a cascade of problems: mold spores circulating into living spaces, rotting floor joists, sagging insulation, and musty odors.
Signs You Need a Sealed Crawl Space in Your Raleigh Home
Central NC’s humid climate and frequent rain make crawl spaces especially vulnerable to moisture intrusion. Watch for these warning signs that indicate your crawl space may benefit from encapsulation:
Indoor Air Quality & Comfort Indicators
- Musty or moldy odors – Persistent smells that rise from floors or are noticeable in HVAC airflow.
- Increased allergy symptoms – More sneezing, coughing, or congestion, especially when the HVAC runs.
- Condensation on windows or pipes – Excess moisture in the crawl space can raise indoor humidity levels.
- Uneven indoor temperatures – Rooms above the crawl space feel colder in winter or hotter in summer despite thermostat settings.
Structural & Visual Clues in the Crawl Space
- Standing water or damp soil – Puddles, soggy areas, or water stains on the vapor barrier or foundation walls.
- Visible mold or mildew – Fuzzy growth on joists, beams, insulation, or the existing vapor barrier.
- Rotting or softened wood – Floor joists, beams, or sill plates that feel spongy or show signs of decay.
- Sagging or compressed insulation – Fiberglass or foam insulation that has collapsed or appears waterlogged.
- Pest evidence – Droppings, nests, or chewed material indicating rodents or insects have taken up residence.
- Efflorescence on foundation walls – White, powdery deposits signaling water migration through masonry.
If you notice any of these symptoms, a professional crawl‑space inspection can determine whether encapsulation is the right solution.
Our Crawl Space Encapsulation Process
At Drainage & Waterproofing Solutions, we follow a thorough, step‑by‑tep protocol to ensure your encapsulation system performs effectively for decades. Each phase minimizes disruption while maximizing long‑term protection.
Phase 1: Free Evaluation & Custom Design (1‑2 hours)
- On‑site inspection – We measure crawl‑space dimensions, assess current conditions (moisture, mold, pests, insulation), and identify water entry points.
- Utility locate – We contact 811 to mark any underground lines before work begins.
- Moisture testing – We use hygrometers and moisture meters to quantify humidity levels and ground moisture.
- Custom design – We specify vapor‑barrier thickness, vent‑sealing methods, dehumidifier size, insulation needs, and drainage details.
- Itemized estimate – You receive a clear breakdown of materials, labor, permits, and cleanup costs.
Phase 2: Preparation & Cleaning (½‑1 day)
- Debris removal – We clear out old insulation, vapor barrier remnants, stored items, and any organic material.
- Mold remediation (if needed) – Surface mold is cleaned with EPA‑approved antimicrobials; severely affected materials may be removed and replaced.
- Water mitigation – Standing water is pumped out; we address grading, gutter extensions, or exterior drainage issues that contribute to intrusion.
- Surface prep – The floor and walls are cleaned and leveled to ensure proper adhesion of sealants and barrier seams.
Phase 3: Vapor Barrier Installation (1‑2 days)
- Floor barrier deployment – Heavy‑duty polyethylene sheeting is laid across the entire crawl‑space floor, overlapping seams by 6‑12 inches.
- Wall barrier attachment – The barrier is pulled up the foundation walls (typically 6‑12 inches above the interior grade) and sealed to the wall with adhesive or mechanical fasteners.
- Seam sealing – All overlaps and edges are sealed with specialized waterproof tape or bead‑applied sealant to create a continuous membrane.
- Penetration sealing – Pipes, wires, and support posts that pierce the barrier are fitted with waterproof boots or collars.
Phase 4: Vent & Access Sealing (½‑1 day)
- Vent covers – Foundation vents are sealed with airtight, insulated covers that block outside air while allowing for future access if needed.
- Access doors/hatches – Existing entries are replaced with gasketed, insulated doors or sealed with spray foam and vapor‑ barrier flashing.
- Rim joist sealing – The band joist where the floor system meets the foundation is sprayed with closed‑cell foam or wrapped with vapor‑ barrier tape to prevent air leakage.
Phase 5: Insulation & Dehumidification Installation (½‑1 day)
- Wall insulation (optional) – Rigid foam boards are adhered to foundation walls, or spray‑applied foam is used to achieve desired R‑values.
- Dehumidifier placement – A crawl‑space‑specific dehumidifier is positioned on a level surface, near a condensate drain or pump.
- Drainage setup – The dehumidifier’s condensate line is routed to a sump pump, floor drain, or exterior discharge point with a check valve to prevent backflow.
- Electrical hookup – The unit is plugged into a dedicated GFCI‑protected outlet; we ensure the circuit can handle the load.
Phase 6: Final Testing & Cleanup (½‑1 day)
- Humidity verification – We run the dehumidifier for 24‑48 hours and confirm humidity stabilizes within the target range (45‑55%).
- Barrier integrity check – Seams, penetrations, and edges are inspected for gaps or lifts.
- Airflow test (if applicable) – We verify that any required supply or exhaust air (per NC code) is functioning correctly.
- Debris removal – All tools, materials, and waste are hauled away; the crawl space is left clean and tidy.
- Homeowner walkthrough – We review the completed system, show you the dehumidifier controls, and provide maintenance instructions.
What to Expect During Your Crawl Space Encapsulation Project
Knowing the timeline and what to anticipate helps you plan and reduces uncertainty.
Before Work Begins
- You’ll receive a firm start date and estimated duration based on crawl‑space size and condition.
- We’ll discuss access needs, parking for equipment, and any specific concerns (e.g., pet safety, irrigation lines).
- You may want to flag any private underground lines (invisible pet fences, low‑voltage lighting) in addition to the 811 locate.
During Preparation & Cleaning
- Expect noise from vacuums, pumps, and hand tools as we remove debris and water.
- The crawl space will be wet and messy initially; we contain moisture to prevent spread to living areas.
- Access to the crawl space will be restricted for safety while we work.
During Barrier Installation
- You’ll see large rolls of polyethylene being unrolled and sealed across the floor and walls.
- The space will look like a giant white “pool liner” as seams are taped and edges are secured.
During Vent Sealing & Insulation
- Vent covers are installed over existing openings, creating a tight seal.
- If insulation is added, you’ll see foam boards being adhered or spray foam being applied to walls.
During Dehumidifier Setup
- The dehumidifier unit is placed and plugged in; you may hear a low hum as it begins to remove moisture.
- We’ll set the humidistat to your preferred level and explain how to monitor the display.
After Completion
- The crawl space will appear clean, dry, and uniformly lined with vapor barrier.
- You’ll receive a warranty packet, operation manual for the dehumidifier, and maintenance schedule.
- We’ll recommend checking the dehumidifier’s filter monthly and draining the condensate pump (if equipped) as needed.
- Final payment is collected upon your satisfaction with the completed work.
Throughout the process, we prioritize clear communication, respect for your property, and minimal disruption to your daily life.
Typical Cost Ranges for Raleigh Crawl Space Encapsulation
Based on 2024‑2025 market data and our own pricing, here’s what most Raleigh homeowners can expect:
Crawl‑Space Size | Cost Range | Average Cost |
Small (< 800 sq ft) | $3,500‑$6,500 | $5,000 |
Medium (800‑1,500 sq ft) | $5,500‑$9,500 | $7,500 |
Large (1,500‑2,500+ sq ft) | $8,000‑$13,000+ | $10,000 |
Complex (with mold remediation, insulation, or drainage upgrades) | $10,000‑$18,000+ | $13,000 |
Per‑square‑foot costs typically range from $4‑$8 for a basic vapor‑barrier‑only encapsulation, and $6‑$12 per square foot when including dehumidification, vent sealing, and optional insulation.
For comparison:
- Peak Energy NC reports that most crawl‑space encapsulation projects in North Carolina cost between $6,000 and $12,000, with smaller jobs (vapor‑barrier only) starting around $1,500.
- HomeAdvisor notes an average cost of $5,500, with most homeowners spending between $5,000 and $15,000, emphasizing that labor accounts for 50‑70% of the totaotal.
- Angi states that basic crawl‑space encapsulation costs $2‑$4 per square foot, while more extensive encapsulations (with repairs, insulation, or premium dehumidifiers) run $3‑$10 per square foot.
- Crawl Space Ninja cites a basic encapsulation starting at $1,500+ for minimal work.
- Olshan Foundation breaks down material costs at $0.15‑$0.50 per square foot for the barrier, plus $2.00‑$4.00 per square foot for installation labor.
What’s Included in Our Estimate
- Materials – Vapor‑barrier polyethylene, seam tape, vent covers, access doors, insulation (if selected), dehumidifier, condensate pump/drain, and fasteners.
- Labor – Debris removal, cleaning, barrier installation, vent sealing, insulation (if any), dehumidifier setup, and testing.
- Equipment – Vacuums, pumps, sealing tools, lifts (if needed), and hauling fees.
- Permits – Any required local permits (we manage the application process).
- Cleanup – Debris removal, sanitizing, and final site tidy‑up.
- Warranty – Our workmanship guarantee and manufacturer warranties on materials and equipment.
Warranties & Long‑Term Protection
Your encapsulated crawl space is a long‑term investment in your home’s health, efficiency, and structural integrity. We stand behind our work with robust warranties that protect your investment for years to come.
Maintenance for Optimal Longevity
While encapsulation is low‑maintenance, these simple steps ensure decades of reliable performance:
- Check the dehumidifier – Empty the condensate tank (if not pumped) and clean the filter monthly.
- Monitor humidity – Keep the display within the 45‑55% range; spikes may indicate a barrier breach or dehumidifier issue.
- Inspect the barrier – Once a year, look for tears, punctures, or lifted seams—especially around penetrations and edges.
- Keep access clear – Ensure the crawl‑space door or hatch remains unobstructed for inspections or filter changes.
- Professional check‑up every 2‑3 years – We offer affordable re‑inspections to verify barrier integrity, dehumidifier function, and overall conditions.
With proper installation and minimal upkeep, a professionally encapsulated crawl space can last 20‑30+ years—often outlasting the homeowners who install it.
Contact Us Today
Don’t let another humid season leave you worrying about musty odors, sagging floors, or rising energy bills. Take the first step toward a dry, healthy home with a professional crawl space encapsulation from the Triangle’s trusted moisture‑control experts.
Call Us Today: (919)-508-7503
Experience the difference of a locally owned, family‑operated company that’s been protecting Triangle homes from moisture damage since 2010—where your property, your investment, and your peace of mind come first.
Frequently Asked Questions About Sealed Crawl Space Encapsulation
Q: What is crawl space encapsulation?
A: Crawl space encapsulation is the process of sealing the crawl space from the earth and outside air using a heavy‑duty vapor barrier, sealed vents and access points, insulation (optional), and a dehumidification system to control moisture, improve air quality, and increase energy efficiency.
Q: How long does crawl space encapsulation take?
A: Most residential encapsulation projects take 1‑3 days from start to finish, depending on size and condition. A small crawl space (< 800 sq ft) often completes in one day, while a medium or large space (800‑2,000+ sq ft) may require 2‑3 days, especially if mold remediation or insulation is added.
Q: Do I need a dehumidifier in my encapsulated crawl space?
A: Yes. A dehumidifier is essential to maintain low humidity levels (45‑55%) and prevent mold growth, even after the vapor barrier blocks ground moisture. We size the unit based on your crawl‑space volume and local climate conditions.
Q: Can you encapsulate a crawl space with existing mold or water damage?
A: Absolutely. We perform mold remediation, remove water‑damaged materials, and address the source of intrusion before installing the barrier. This ensures a clean, dry starting point for the encapsulation.
Q: Will encapsulation lower my energy bills?
A: Many homeowners see a reduction in heating and cooling costs after encapsulation. By sealing off outside air and adding insulation (if chosen), the HVAC system works less to maintain indoor temperatures, often saving 10‑20% on yearly energy bills.
Q: Do I need to be home during the encapsulation process?
A: Not necessarily. Many clients provide access instructions and leave for work while we complete the job. We’ll call or text you with updates and require your approval before starting and upon completion for the final walkthrough.
Q: How does an encapsulated crawl space affect indoor air quality?
A: By blocking moisture and mold growth in the crawl space, encapsulation reduces the amount of mold spores, mildew odors, and other pollutants that can infiltrate your living space through floors, walls, or the HVAC system, resulting in cleaner, healthier indoor air.
Q: What’s the difference between a vapor barrier and full encapsulation?
A: A simple vapor barrier covers only the floor (or floor and lower walls) and is not sealed at seams or edges. Full encapsulation covers the floor, extends up the walls, seals all seams and penetrations, closes vents, and includes dehumidification to actively control humidity.
Q: Does encapsulation meet North Carolina building code?
A: Yes. Our installations follow the NC Residential Code for closed crawl spaces (R409), which requires sealed walls, controlled supply air, and prohibits return air from the crawl space to the dwelling. We ensure all work complies with these standards.
Posted in Basement Moisture Control, Encapsulated Crawl Spaces