
Sump Pump Discharge Too Close to House? Why Water Returns & How to Fix It

October 5th, 2026
Sump Pump Drainage Troubleshooting | Raleigh, NC

Sump Pump Discharge Too Close to House? Why Water Returns & How to Fix It

Sump pump discharge that empties too close to your house can undermine the purpose of an otherwise functioning basement drainage system. Instead of moving collected water away from the foundation, the outlet may release it where the ground slopes back toward the home, allowing water to pool, soak into nearby soil, or potentially return to the drainage system.

This can happen even when the sump pump itself turns on correctly and moves water through the pipe. A functioning pump does not automatically mean the discharge route is working properly.

This guide explains how sump pump discharge systems work, why water sometimes returns toward the foundation, how to recognize recirculation and outlet restrictions, which repairs may help, and how to plan a safer discharge location for a North Carolina home.

Discharge Line Problems Water Recirculation Foundation Drainage Raleigh & Central NC
?
Quick Answer

Can Sump Pump Discharge Too Close to a House Cause Water to Return?

Yes. Sump pump discharge can contribute to water returning toward a foundation when the outlet releases water where grading, soil conditions, or drainage pathways allow it to move back toward the house. This may increase local soil saturation and, in some conditions, contribute to water re-entering the foundation drainage system.

Potential solutions include moving the outlet to an appropriate location, correcting the discharge route, repairing a blocked or damaged line, improving surface grading, or installing a suitable drainage outlet. There is no universal discharge distance that guarantees water will move away from every house. Site conditions and applicable local rules determine the appropriate solution.

Understand the System

How Is a Sump Pump Discharge System Supposed to Work?

A sump pump removes water collected in a sump basin, commonly located in the lowest part of a basement or crawl-space drainage system. Water may reach the basin through interior perimeter drains, other collection components, or site-specific pathways.

When the water reaches the pump's operating level, the float switch or another control activates the pump. The pump pushes water through the discharge piping toward an outlet outside the building.

That outlet must release water in a manner that does not simply create another drainage problem beside the foundation.

01

Collection

Water enters the sump basin from the designed drainage or collection system.

02

Pumping

The pump activates and pushes collected water into the discharge line.

03

Discharge

Water travels through the line toward a suitable discharge point away from vulnerable areas.

A complete sump pump installation involves more than choosing the pump itself. Discharge piping, fittings, elevation, flow resistance, controls, check-valve configuration, and the receiving outlet all affect how the system performs.

For homeowners trying to determine whether they need a pump in the first place, the company's existing Do I Need a Sump Pump? guide explains system selection. This article focuses specifically on the discharge route of an existing sump pump.

The Complete Water Pathway

Four Stages of Effective Sump Pump Discharge

STAGE 01 Collect Water

Foundation drainage directs water toward the sump basin.

STAGE 02 Activate Pump

The pump starts when the basin reaches its operating level.

STAGE 03 Convey Water

The discharge line transports water toward the outlet.

STAGE 04 Release Safely

Water leaves through an appropriate route without being directed back.

The critical distinction: A sump pump may perform the first three stages successfully while the fourth stage remains defective. The pump can move water efficiently, yet the outlet may still release it in the wrong place.

What Is the Difference Between the Discharge Pipe and the Outlet?

The discharge pipe transports water from the pump. The outlet is where that water leaves the system.

A pipe can be properly connected to a working pump while the outlet is located too close to the house, blocked by landscaping, or discharging into an unsuitable low area.

For this reason, a discharge inspection should evaluate the whole route rather than checking only the pipe attached to the pump.

Root-Cause Diagnosis

Seven Reasons Sump Pump Discharge Water Returns Toward a House

Several different problems can produce standing water beside the foundation. The outlet may be poorly positioned, the line may be restricted, or the property may direct water back toward the home after discharge.

01

Discharge Outlet Located Too Close to the Foundation

An outlet that empties directly beside a basement wall can concentrate a substantial amount of pumped water into a small area of soil.

If the soil does not absorb and redistribute the water adequately, the area may become saturated. Water may remain on the surface or move through nearby soil.

Depending on the foundation drainage arrangement, some of that water may eventually return toward the same collection system that the pump is trying to empty.

The appropriate correction depends on ground slope, soil conditions, discharge volume, nearby openings, and a suitable destination. Simply extending the pipe a short distance without checking these factors may not resolve the issue.

02

Yard Grading Slopes Back Toward the House

Even when a discharge outlet is located some distance away, water may travel back toward the foundation if the surrounding ground slopes in that direction.

Low spots, settled backfill, raised landscaping beds, walkway edges, and changes from previous construction can redirect runoff.

A discharge line can therefore appear long enough while still releasing water into an area that drains toward the house.

Correcting this condition may require improved surface grading, a different discharge location, or another planned drainage route.

03

Blocked or Buried Discharge Outlet

An outlet may become obstructed by leaves, mulch, soil, grass growth, roots, or accumulated sediment.

Landscape work can also bury or cover an outlet that was previously visible.

When the discharge path is restricted, the pump may move less water than expected. Depending on the severity, water may back up in the line or the pump may struggle to empty the basin.

A blocked outlet is different from an outlet that is simply too close to the house. The first problem involves flow restriction; the second involves the destination of the released water.

04

Underground Discharge Pipe Is Damaged or Improperly Routed

Buried discharge piping may develop cracks, disconnected joints, crushed sections, or other defects.

Poor support, settlement, root activity, external loading, and inappropriate pipe materials may contribute to damage.

A damaged underground line can release water before it reaches the intended outlet, causing localized wet soil or recurring surface pooling.

A line that retains water in low sections may also have increased exposure to sediment accumulation or freezing where temperatures allow.

Repairs should be based on the actual pipe layout and the location of the defect.

05

Water Re-Enters the Same Foundation Drainage System

Recirculation occurs when some of the discharged water returns to the collection system and is pumped again.

This can happen when the outlet releases water into soil or surface drainage that leads back toward the home's foundation.

The amount that returns depends on the soil, grading, drainage connections, water volume, and site conditions.

Recirculation can increase pump activity, but frequent cycling by itself does not prove this is happening. A defective check valve, small basin, high inflow, or control problem can produce similar symptoms.

06

Frozen or Partially Frozen Discharge Line

During freezing weather, water retained in exposed or poorly drained sections of the discharge line may freeze and restrict flow.

An underground pipe near the surface or an outlet where water accumulates may also be vulnerable under certain conditions.

A frozen line can prevent the pump from discharging normally, even when the motor and float switch are functioning.

Freeze prevention depends on the local climate, pipe routing, burial conditions, drainage, and the manufacturer's installation requirements.

Do not use open flames, unsafe electrical heaters, or excessive force to thaw drainage piping.

07

Outlet Discharges Into an Overloaded or Unsuitable Drainage Area

A sump discharge outlet may be located away from the immediate foundation but still empty into a depression, saturated area, or drainage system that cannot receive additional water at that time.

Where downstream conditions restrict discharge, water may back up or accumulate around the outlet.

A connection to an existing drainage line also needs to be evaluated for capacity, backflow potential, maintenance access, and applicable rules.

The solution may involve outlet correction, drainage redesign, or rerouting water to a more appropriate destination.

Recognize the Warning Signs

How Can You Tell if Your Sump Pump Discharge Is Causing Problems?

The most useful clues involve where water appears, when the pump runs, and how the water moves after leaving the outlet.

What You Notice Possible Explanation Recommended Investigation
Water pools beside the foundation after pumping Discharge too close, negative grading, or low ground near outlet Observe outlet location and runoff direction
Pump runs frequently after rain ends Continuing groundwater inflow, recirculation, check-valve issue, or controls Review basin, discharge and cycling pattern
Little water exits while the pump operates Pipe restriction, leak, frozen line, or pump problem Inspect discharge route and pump performance
Wet soil appears along buried pipe route Possible underground leak or another moisture source Investigate pipe integrity and nearby drainage
Water flows across a walkway or driveway Unsuitable outlet location or grading Evaluate rerouting and safety concerns
Erosion develops near outlet Concentrated discharge or unsuitable outlet protection Assess flow and erosion control
Basement seepage returns during storms Insufficient drainage, pump failure, discharge issues, or another water pathway Evaluate complete water-management system
Outlet freezes during cold weather Water retained in vulnerable pipe sections Check line routing and freeze exposure

Can the Sump Pump Work Normally While the Discharge Is Wrong?

Yes. The pump may start, move water through the connected piping, and stop after lowering the basin water level.

If the outlet discharges into an area that returns water toward the foundation, the pump may still be functioning mechanically.

This is why discharge placement and surface drainage should be evaluated separately from motor operation.

i

One Symptom Is Not a Diagnosis

Frequent sump pump cycling does not automatically prove water recirculation. Standing water near an outlet does not automatically mean a foundation leak has occurred. A reliable assessment combines pump behavior, outlet location, water pathways, soil conditions, and the existing drainage design.

Understanding Recirculation

What Is Sump Pump Water Recirculation, and Why Does It Matter?

Sump pump recirculation is the repeated movement of some water from the discharge outlet back into the drainage or collection system.

A properly operating sump pump removes water from the collection basin. However, if discharged water travels back toward the foundation, some of it may enter the same drainage network again.

The result can be additional pump operation without effectively moving all the water away from the vulnerable area.

Problem Pathway

How Water Can Return to the Same Sump System

STEP 01 Water Collected

Groundwater or seepage enters the foundation drainage system.

STEP 02 Pump Activates

Water is pumped through the discharge pipe.

STEP 03 Outlet Too Close

Water is released where it can migrate toward the foundation.

STEP 04 Water Returns

Some water may re-enter the collection system and be pumped again.

This is a possible hydraulic pathway, not something that can be confirmed by hearing a pump run. Site-specific observations and inspection are needed to establish whether recirculation is occurring.

Is Short Cycling the Same as Recirculation?

No. Short cycling generally describes a pump turning on and off repeatedly over short intervals.

It can result from a defective or missing check valve, an incorrectly positioned float switch, a small sump basin, high inflow, an oversized pump relative to the basin, or other system conditions.

Recirculation can contribute to repeated pumping, but it is only one possible explanation.

What Does a Check Valve Do?

A check valve is designed to limit water flowing backward through the discharge pipe toward the sump basin after the pump stops.

It does not prevent water that was released outside from moving through the yard or soil back toward the foundation.

Therefore, replacing a check valve will not correct an exterior discharge outlet that releases water in the wrong location.

Troubleshooting Before Repair

How Can You Identify a Sump Pump Discharge Problem?

The safest initial assessment focuses on visible water movement, the pump's operating pattern, and known discharge components.

Homeowners do not need to excavate piping or open electrical equipment to collect useful information for a professional.

A

Locate the Outlet

Identify where the discharge line ends, when safely visible.

B

Observe Water Flow

Check whether pumped water flows away from or toward the house.

C

Review Ground Slope

Look for low spots, settled soil, or grading toward the foundation.

D

Document Cycling

Note when the pump starts and stops during and after rain.

E

Check Visible Damage

Observe accessible piping for disconnections, leaks, or damaged fittings.

F

Record Recent Changes

Note landscaping, pipe work, soil settlement, or outlet changes.

Why Is the Outlet Location Important?

The outlet determines where the pumped water enters the surrounding drainage environment.

An outlet may be positioned several feet away but still empty into a low area that directs water back toward the structure.

Conversely, the appropriate distance for another property may be different because its grade, soil, drainage network, and discharge opportunities are different.

What if the Discharge Pipe Is Buried?

A buried line should not be excavated based solely on a wet patch or an assumed pipe route.

The location of the actual discharge should be established where possible, and underground utilities must be appropriately located before digging.

A qualified contractor may use suitable testing or inspection methods to identify restrictions, damage, or an unsuitable outlet.

Does a Discharge Problem Always Require a New Pump?

No. If the pump is functioning correctly, the correction may involve outlet relocation, line repair, grading, or another drainage measure.

Replacing the pump without addressing an inappropriate discharge route may leave the exterior water problem unchanged.

Safety and Emergency Guidance

What Should You Do if Sump Pump Discharge Is Flooding Near Your House?

If water is accumulating beside the foundation or entering the basement, prioritize safe observation and professional assistance.

Important Electrical and Flooding Safety Warning

Do not enter standing water where electrical equipment may be energized. Avoid touching wet outlets, cords, appliances, or electrical panels.

Do not disconnect a sump pump during an active water intrusion event unless a qualified person has determined the appropriate safe action.

Never attempt underground excavation near utilities without proper utility locating. Do not use open flames to thaw frozen discharge piping.

Safer Initial Actions

  • Observe the outlet from safe ground.
  • Photograph discharge water and pooling.
  • Document when the pump operates.
  • Keep children away from flooded areas.
  • Move unaffected belongings when safe.
  • Request help when water enters living space.

Avoid These Actions

  • Handling electrical equipment in water.
  • Cutting or disconnecting unknown piping.
  • Digging near unlocated utilities.
  • Connecting discharge to an unidentified sewer.
  • Directing water onto a neighboring property.
  • Forcing tools through a frozen or damaged pipe.

What if the Sump Pump Is Running but No Water Comes Out?

A pump that appears to operate without visible discharge may have a blocked line, frozen pipe, damaged connection, air-lock issue, internal pump defect, or another mechanical problem.

It may also discharge through an outlet that is not readily visible.

If the basin continues filling, basement water is rising, or the pump is making unusual noises, arrange prompt professional evaluation rather than repeatedly operating or disassembling the equipment.

Visual Homeowner Guide

Sump Pump Discharge Too Close to House: Causes, Warning Signs & Fixes

The following infographic illustrates how a basement sump pump moves water through an exterior discharge line, and why an outlet positioned near the foundation may allow water to return.
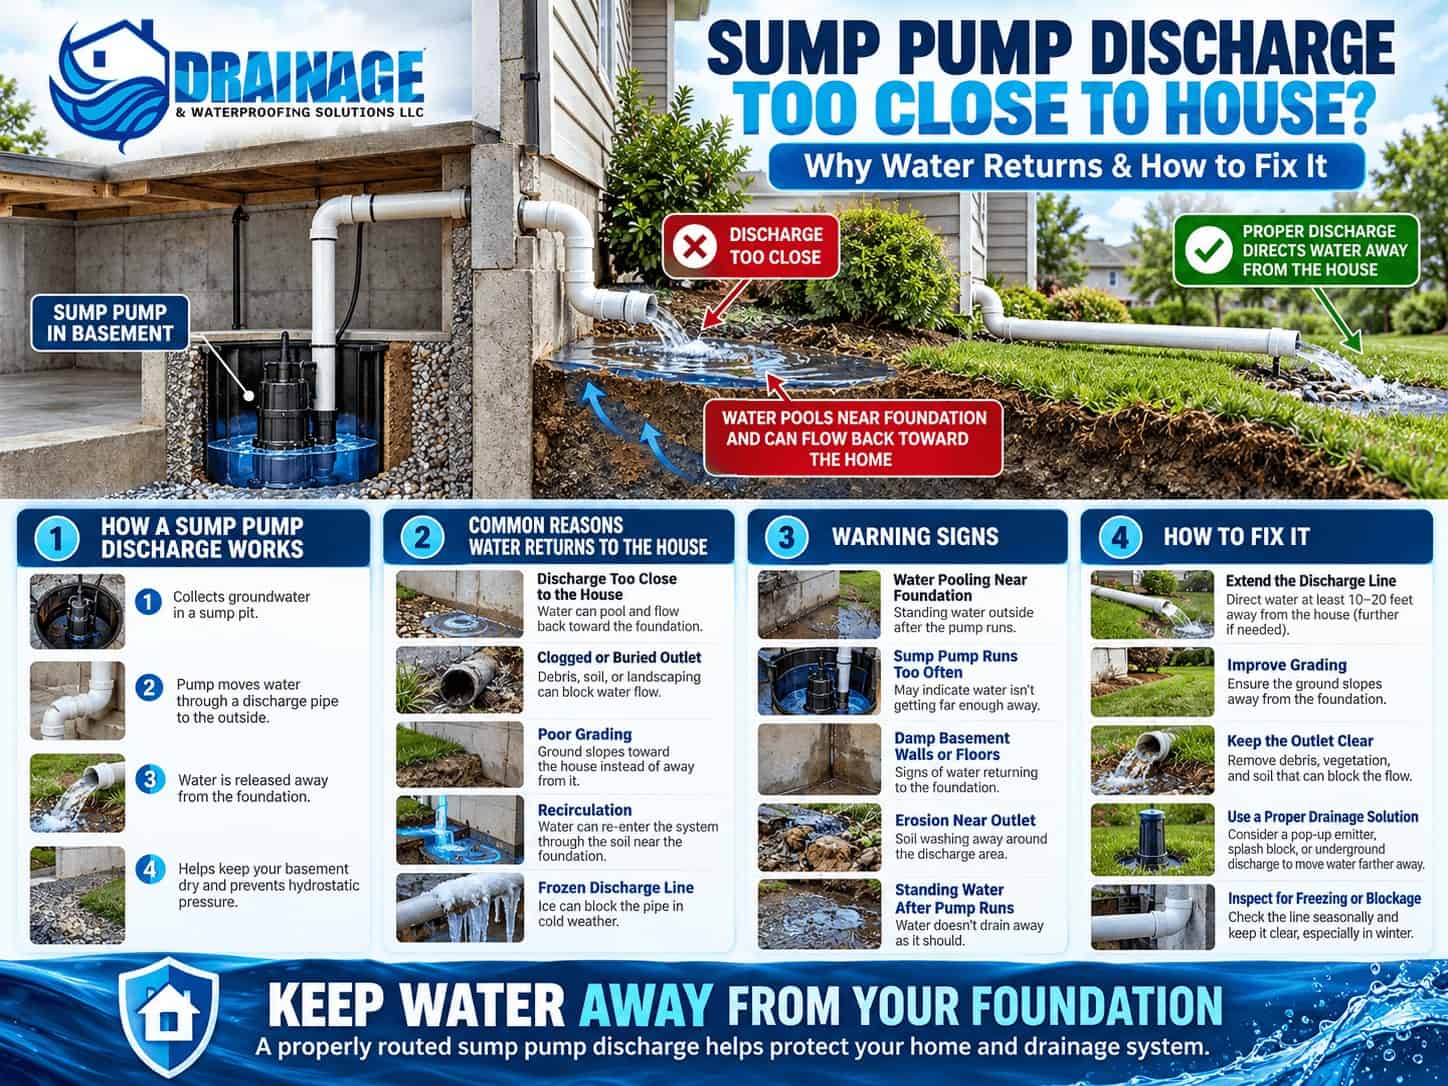
Sump pump discharge infographic comparing water pooling at a foundation with properly routed discharge, including outlet blockages, recirculation, grading and repairs
Illustrative sump pump discharge system showing water collection, discharge routing, foundation pooling, warning signs, and potential repairs. Actual installation requirements and discharge locations depend on site conditions.
i

Important Distance Clarification

The infographic includes an example of extending a discharge line approximately 10–20 feet. This is not a universal minimum, code requirement, or guarantee. A suitable discharge point must be selected according to property grading, soil conditions, local requirements, and where water can safely drain.

Correct the Water Pathway

What Are the Best Ways to Fix Sump Pump Discharge Problems?

The right repair is the one that addresses the confirmed failure while allowing the sump system to operate as designed.

Some problems require only limited maintenance. Others need a different outlet, grading correction, buried pipe repair, or changes to the drainage design.

Outlet Location

1. Extend the Discharge Line to an Appropriate Location

Where the outlet is too close to the foundation, extending or rerouting the discharge may reduce water accumulation near the house.

The new destination should be selected based on ground slope, runoff pathways, erosion potential, neighboring properties, and applicable local requirements.

Longer piping can increase friction losses and affect pump performance, particularly where there are multiple bends or significant elevation changes.

The pump and pipe system should be evaluated together to verify that the revised route remains appropriate.

Surface Grading

2. Correct Soil Grading That Sends Water Back Toward the Foundation

If surrounding soil slopes toward the house, water may return even after the discharge line has been extended.

Regrading may help direct surface runoff away from the structure. The work should account for building clearances, walkways, patios, landscaping, and existing drainage routes.

The objective is not simply to raise soil beside the outlet, but to create an appropriate surface water pathway.

Outlet Maintenance

3. Clear Debris From an Accessible Discharge Outlet

When leaves, mulch, sediment, or vegetation obstruct an accessible outlet, appropriate maintenance may restore normal discharge.

However, recurring restrictions may indicate poor outlet protection, sediment movement, or a downstream issue.

A buried or submerged outlet should not be forced open without understanding its connection and receiving drainage.

Pipe Integrity

4. Repair a Damaged or Disconnected Discharge Pipe

A cracked, separated, crushed, or leaking pipe may need localized repair or replacement.

Where the line is underground, the pipe route and affected section should be identified before excavation.

Repairs should consider pipe material, support, fittings, water flow, and protection from expected site conditions.

Drainage Outlet

5. Use a Properly Designed Discharge Outlet

Depending on the property, a suitable discharge arrangement might use a surface outlet, an approved underground conveyance route, a properly designed pop-up emitter, or another permissible stormwater solution.

Not every option works on every lot.

A pop-up emitter, for example, must be located where released water can continue draining rather than pooling and moving back toward the house.

Outlet selection should also address maintenance, freezing exposure, erosion control, and local discharge restrictions.

Winter Protection

6. Correct Discharge-Line Freezing Vulnerabilities

Where freezing has restricted a discharge line, the remedy may involve changes to routing, drainage, exposure, or other system components.

The correct approach depends on pipe configuration and the local climate.

Water should not be allowed to accumulate in vulnerable pipe sections when the system design requires them to drain.

Do not improvise with unsafe heaters, open flames, or electrical devices near wet conditions.

System Evaluation

7. Evaluate Pump Performance and Discharge Capacity Together

If the discharge route is being substantially changed, the pump's operating conditions may change too.

Vertical lift, pipe length, fittings, friction losses, and expected inflow affect whether the pump can deliver adequate water through the new route.

A larger pump is not automatically the answer.

A qualified contractor should evaluate the pump performance information and drainage design before recommending equipment replacement.

Which Solution Matches the Confirmed Problem?

Confirmed Problem Potential Solution What It Does Not Fix
Discharge outlet too close to foundation Extend or reroute to a suitable location A separate pump or check-valve defect
Ground slopes toward house Correct surface grading and runoff A blocked discharge pipe
Outlet obstructed by debris Safe maintenance and outlet inspection An incorrectly routed underground line
Damaged buried discharge pipe Repair or replace affected section Inadequate downstream drainage
Discharge area repeatedly saturates Evaluate outlet destination and receiving capacity A float switch malfunction
Frozen discharge pipe Correct vulnerable routing and drainage conditions Unrelated groundwater inflow
Pump cycles frequently because water returns Correct confirmed recirculation route Other causes of short cycling

If recurring water also affects basement walls or floors, a broader foundation drainage assessment may be appropriate. Learn more about foundation waterproofing and drainage system inspections from Drainage & Waterproofing Solutions LLC.

Discharge Location Guidance

How Far From the House Should a Sump Pump Discharge?

There is no single distance that guarantees proper sump pump discharge for every home.

A discharge outlet needs to direct water away from the foundation to a suitable receiving area or approved drainage route.

The correct location depends on several site-specific factors.

01

Ground Slope

Water should not be directed back toward the home by the surrounding grade.

02

Soil Conditions

Soil permeability and saturation affect how water moves after discharge.

03

Discharge Volume

The amount and frequency of pumping influence the required receiving area capacity.

04

Nearby Structures

Other foundations, walkways, driveways, and neighboring properties must be considered.

05

Erosion Potential

Concentrated water may wash away soil when the outlet is inadequately protected.

06

Local Requirements

Permitted stormwater connections and discharge locations vary by jurisdiction.

Can Sump Pump Discharge Go Into a Storm Drain?

Not automatically. Connections to public stormwater infrastructure may require authorization, permits, or compliance with local standards.

A nearby storm drain is not permission to connect private discharge piping.

The appropriate local authority should be consulted before modifying connections to municipal drainage.

Can Sump Pump Water Go Into a Sanitary Sewer?

Do not assume that it can. Sanitary sewer systems are intended to carry wastewater, and local requirements may prohibit or restrict sump water connections.

An unidentified pipe should never be used as a discharge destination without confirming its purpose and whether the connection is permitted.

Is Burying a Sump Pump Discharge Line Better?

A buried discharge line may protect piping from some physical damage and reduce visual clutter, but burial alone does not guarantee proper performance.

A buried line still needs an appropriate slope or hydraulic design, suitable materials, maintenance access, and a functioning outlet.

Low sections may retain water, and underground leaks can be harder to identify.

The decision should be based on the complete site drainage plan.

Avoid the Wrong Repair

Is It a Sump Pump Failure or a Discharge Drainage Problem?

The difference matters because repairing the wrong component may leave water returning after every storm.

Discharge or Exterior Drainage Problem

  • Pump may start and stop normally.
  • Water is visibly leaving the outlet.
  • Pooling develops near the foundation.
  • Ground slope may direct water back.
  • Underground pipe or outlet may be defective.
  • Correction may involve routing or grading.

Pump or Internal System Problem

  • Pump may fail to activate.
  • Water level may continue rising in the basin.
  • Float switch may malfunction.
  • Check valve may allow pipe water to return.
  • Mechanical capacity may be inadequate.
  • Correction may require equipment servicing.

Some homes experience both types of problems. For example, a partially restricted discharge line may reduce pump performance while the outlet also releases water into poorly graded soil.

The entire water pathway should be evaluated when symptoms do not fit one clear explanation.

Should You Install a Bigger Sump Pump?

Not simply because water collects near the outlet. A larger pump can send water through the same inappropriate discharge path more quickly.

Pump sizing should follow the expected inflow, vertical lift, pipe configuration, performance curve, and drainage-system design.

When the existing pump operates correctly, the discharge destination may be the more important problem to address.

Prevention and Repair Planning

How Can You Prevent Sump Pump Discharge Problems?

Regular observation can help identify outlet restrictions, erosion, line damage, and changes in discharge performance before they contribute to interior flooding.

Seasonal Maintenance Framework

Four Areas to Monitor

CHECK 01 Outlet

Observe for leaves, mud, vegetation, and other restrictions.

CHECK 02 Water Direction

Verify discharge does not visibly run back toward the house.

CHECK 03 Pipe Condition

Look for damaged fittings, exposed sections, and leaks.

CHECK 04 Pump Behavior

Document unusual cycling and changes during rainstorms.

Before Heavy Rain

Check known, accessible discharge components for visible debris and damage.

Make sure nearby landscaping has not covered the outlet. Observe whether surface grading directs water away from the structure.

During and After Rainfall

From a safe position, watch where pumped water travels.

Record unusual pooling, erosion, or increased pump cycling. Photographs can help a contractor understand conditions that may not be visible during dry-weather inspection.

Before Freezing Weather

Inspect exposed discharge sections for obvious damage or places where water may be retained.

Have vulnerable piping evaluated before cold conditions when recurring freeze problems have occurred.

After Landscaping or Excavation

Check the discharge route after installing walkways, patios, garden beds, retaining walls, or underground utilities.

Such work can alter grading, bury outlets, or damage piping.

How Much Does Sump Pump Discharge Repair Cost?

Costs vary because the work may involve a small exterior correction or an extensive underground drainage modification.

The scope depends on the actual cause, not simply whether water is visible.

Cost Factor Why It Matters
Outlet relocation Distance, destination and site access affect work
Underground pipe Excavation, fittings and restoration may be required
Existing pump capacity A revised discharge route may change operating demands
Grading corrections Landscape and surface restoration vary by property
Drainage connections Permits and receiving system conditions may affect design
Damaged components Check valves, piping or pump equipment may need separate work

Avoid accepting a universal repair price without understanding the water pathway and the proposed discharge destination.

A site evaluation should establish whether the best solution involves maintenance, pipe repair, rerouting, outlet correction, grading, or broader foundation drainage work.

Raleigh and Central North Carolina

Why Does Sump Pump Discharge Placement Matter for North Carolina Homes?

Homes around Raleigh, Garner, Cary, Apex, Durham, Wake Forest, Fayetteville, Southern Pines, and nearby areas may experience periods of intense rainfall and saturated ground.

During wet weather, foundation drainage systems may collect more water than usual. A sump pump that releases water too close to the structure may add to local soil saturation rather than reducing it.

The effect depends on the property. A home on a sloping lot can behave differently from one in a low area.

Clay-rich soils can affect infiltration in some locations, but soil type alone does not establish where a discharge outlet should be placed.

The location should be chosen using the property's grading, runoff pathways, receiving drainage, and applicable municipal requirements.

What if the Property Has a French Drain?

A French drain and a sump pump may serve different roles in the same overall water-management system.

A French drain can collect or redirect certain groundwater or subsurface flows. A sump pump can mechanically remove water collected at a low point.

Whether a sump discharge can connect to another drainage system depends on the design and available capacity.

The line should not be connected simply because another underground pipe is nearby.

Can Improper Discharge Contribute to Basement Seepage?

It can when water released near the house contributes to local saturation or follows a pathway toward vulnerable foundation areas.

However, basement seepage can also result from other groundwater and foundation conditions. The discharge route should be evaluated alongside other possible sources.

For broader moisture management, see the company's Basement Waterproofing Raleigh guide .

i

Technical Limitations

Standing water near a sump discharge does not prove foundation damage or confirm that water is recirculating. Pump cycling patterns also cannot establish recirculation without evaluating check-valve operation, water inflow, controls, and discharge conditions.

The correct recommendation depends on an assessment of the actual system and site.

People Also Ask

Frequently Asked Questions About Sump Pump Discharge

1. How far from the house should a sump pump discharge?

There is no single discharge distance that works for every house. The outlet should direct water away from the foundation to an appropriate drainage location without creating erosion, returning water, or affecting neighboring properties. Soil conditions, ground slope, discharge volume, and local requirements all matter. A commonly suggested extension length is not a substitute for site-specific discharge planning.

2. Can a sump pump discharge too close to the house cause basement flooding?

Yes, under some conditions. Discharge released beside the foundation may increase local soil saturation or flow toward the home. That water can contribute to foundation moisture problems and may re-enter a connected drainage system. However, nearby pooling does not automatically mean basement flooding will occur. The actual risk depends on grading, soil, foundation conditions, and water pathways.

3. Why does my sump pump keep pumping the same water?

Water recirculation can occur when discharge moves back toward the foundation and re-enters the collection system. However, frequent pump cycling can also result from a faulty check valve, high groundwater inflow, a small basin, or float-switch problems. The outlet and pump operation should be evaluated together before assuming the same water is being pumped repeatedly.

4. Can I extend my sump pump discharge pipe myself?

A simple accessible extension may be feasible in some installations, but the discharge location and pipe configuration still need to be appropriate. Longer routes, buried pipes, elevation changes, or connections to other drainage systems require greater care. Incorrect routing can increase pump resistance or send water toward another vulnerable area. Consult a qualified professional when the design is uncertain.

5. Why is water pooling around my sump pump discharge outlet?

Water may pool because the outlet releases flow into a low area, surrounding soil is saturated, the ground slopes poorly, or downstream drainage is restricted. The outlet may also be partially blocked by landscaping or debris. Correcting the problem requires determining whether water is accumulating because of its destination, a physical blockage, or insufficient receiving capacity.

6. Should a sump pump discharge line be buried?

A buried discharge line may be appropriate for some properties, but it must be designed with suitable routing, pipe materials, hydraulic capacity, drainage, and outlet access. Burial alone does not prevent freezing, leakage, or water returning toward the foundation. An above-ground route may work better in some situations. The correct choice depends on site conditions and local requirements.

7. Can a sump pump discharge into a storm drain or sanitary sewer?

Do not connect sump discharge piping to a public storm drain or sanitary sewer without confirming the applicable local requirements and obtaining any necessary authorization. Stormwater and sanitary systems serve different purposes, and unauthorized connections may be prohibited. A qualified contractor or the relevant local authority can help determine a suitable, permitted discharge route.

8. What should I do if my sump pump discharge pipe freezes?

A frozen discharge line can restrict water movement and prevent the pump from emptying the basin normally. Avoid open flames, unsafe electrical heaters, and forcing tools into the pipe. If water is rising inside the home, seek prompt professional assistance. Long-term prevention may require changes to pipe routing, drainage, exposure, or outlet design rather than repeatedly thawing the same line.

9. Will a check valve stop sump pump water from returning to my foundation?

No. A check valve is intended to reduce backflow through the discharge pipe toward the sump basin after the pump stops. It does not prevent water released outside from moving across the yard or through soil toward the foundation. If the exterior discharge destination is wrong, the outlet and drainage pathway need to be evaluated separately.

10. When should I call a drainage professional about sump pump discharge?

Contact a drainage professional when water repeatedly pools near the foundation, the discharge outlet is blocked or damaged, the pump runs unusually often, or basement moisture returns. Professional evaluation is especially important when underground piping, grading, municipal drainage connections, or pump capacity may be involved. The objective is to confirm the source and correct the full discharge pathway.

Stop Water From Returning

Sump Pump Discharge Problems in Raleigh, NC?

If your sump pump releases water beside the house or water repeatedly returns toward the foundation, the problem may involve more than the pump itself.

Drainage & Waterproofing Solutions LLC provides drainage and waterproofing services for homeowners in Raleigh and surrounding North Carolina communities.

An evaluation can help identify whether the appropriate solution involves outlet relocation, grading correction, pipe repair, or broader foundation drainage work.

Sources & Technical References

  1. U.S. Department of Energy — Building America Solution Center
    Building America Solution Center . Technical guidance covering foundation drainage, moisture management, building-envelope water control, and related design considerations.
  2. City of Raleigh — Stormwater Management
    Stormwater Services . Local information about stormwater management and drainage responsibilities. Property-specific connections and permissions require verification with the relevant authorities.
  3. North Carolina Department of Environmental Quality
    Stormwater Program . State-level information about stormwater management and water quality.
  4. Drainage & Waterproofing Solutions LLC
    Drainage System Inspections . Company service information describing inspections of sump pumps, discharge lines, and related drainage components.
  5. Drainage & Waterproofing Solutions LLC
    Foundation Waterproofing . Company information about integrated interior and exterior drainage and foundation moisture management.

Evidence and limitations: This guide provides general homeowner information and does not replace an on-site drainage inspection, plumbing or electrical evaluation, engineered drainage design, or applicable local code and stormwater review. The correct repair depends on the installed system, property grading, available discharge, and site conditions.

Professional Knowledge & Local Expertise

Reviewed by Drainage & Waterproofing Solutions Staff

Drainage & Waterproofing Solutions LLC is a locally owned, family-operated company providing foundation waterproofing, basement drainage, crawl-space moisture control, and drainage-system services for North Carolina homeowners.

The company's published services include sump pump and drainage-system inspection, discharge-line evaluation, foundation waterproofing, and related water-management solutions.
Learn More About Drainage & Waterproofing Solutions LLC

Posted in Sump Pumps, Basement Waterproofing, Drainage Solutions

Why Is My Basement Window Well Filling With Water? Causes & Fixes

October 1st, 2026
Basement Waterproofing | Raleigh & Central North Carolina

Why Is My Basement Window Well Filling With Water? Causes & Fixes

Basement window well flooding can turn an exterior drainage problem into a source of basement water intrusion. When rainwater accumulates around a below-grade window, it may reach the sill, penetrate vulnerable joints, damage interior materials, or expose weaknesses in the drainage system.

This guide explains why basement window wells flood, how to distinguish a blocked drain from excess runoff, which repairs may help, and what homeowners can do to reduce recurring water damage.

Window Well Drainage Basement Flood Prevention Foundation Water Management Raleigh, NC
?
The Quick Answer

Why Does a Basement Window Well Fill With Water?

Basement window well flooding occurs when water enters the well faster than its drainage system can remove it. Common causes include clogged drains, negative landscape grading, concentrated downspout runoff, saturated soil, damaged drainage components, and inadequate discharge routes.

The correct solution depends on identifying both where the water originates and where it should discharge. Cleaning debris may resolve an accessible obstruction, while recurring flooding may require drainage repairs, runoff diversion, grading improvements, or window well reconstruction. A window well cover alone cannot correct a failed drainage system.

Understanding the System

How Is a Basement Window Well Supposed to Drain?

A basement window well is an excavated area outside a window installed below the surrounding ground level. Its retaining walls hold soil away from the window, allowing light and, where designed, ventilation or emergency escape access.

Because the bottom of a window well is below grade, it can naturally collect rainfall and surface runoff. Effective designs therefore need to manage water before it enters the well, collect incidental water, and allow that water to leave through an appropriate drainage pathway.

01

Surface Water Control

Proper grading, suitable landscaping, and downspout discharge reduce the amount of stormwater reaching the well.

02

Water Collection

Drainage materials and an appropriately designed inlet help collect water reaching the bottom of the excavation.

03

Reliable Discharge

A suitable outlet allows collected water to leave rather than accumulating against the basement window.

Some older window wells contain gravel without a separately visible drainpipe. Whether this is adequate depends on soil infiltration, rainfall, the surrounding foundation drainage, and the well's water exposure.

Gravel can provide temporary storage and allow water to reach a drain, but it does not create a reliable discharge route when surrounding soil remains saturated.

Water Management Explained

The Four Stages of Window Well Flooding

Following the water pathway helps distinguish a drainage failure from a problem that begins elsewhere on the property.

STAGE 01 Rainfall

Rain reaches the roof, lawn, paved areas, and exposed window well.

STAGE 02 Runoff

Ground slopes and roof drainage direct water toward the foundation.

STAGE 03 Accumulation

Incoming water exceeds the well's drainage capacity.

STAGE 04 Intrusion

Water may rise toward vulnerable window and wall connections.

Actual drainage systems vary. Water may enter directly from above, flow over the surrounding soil, move laterally through saturated ground, or back up through connected piping. The repair must address the pathway responsible for the flooding.

Root Cause Diagnosis

Seven Common Causes of Basement Window Well Flooding

The visible water level is a symptom. The actual problem may be located in the well, the yard, the roof drainage arrangement, or an underground outlet.

01

Clogged or Restricted Window Well Drain

A window well drain can become obstructed by leaves, mud, fine sediment, roots, and other debris. Over time, material may collect inside the underground pipe or around the inlet where water enters the system.

When the drainage pathway becomes restricted, water may accumulate during rainfall instead of leaving the well at the intended rate.

A visible blockage at the grate is not the same as a crushed buried pipe, a separated connection, or an outlet that has become submerged. Cleaning the surface may not correct a restriction farther downstream.

02

Landscape Grading That Slopes Toward the Foundation

Landscape grading describes the slope of the ground surrounding a property. When the soil slopes toward the house, runoff may collect against the foundation and enter low openings such as window wells.

Grading can change after construction. Settled backfill, erosion, mulch buildup, raised landscape borders, and new paving can redirect water toward a previously protected window.

Even a working window well drain may struggle when a large portion of the surrounding yard channels runoff directly into it.

03

Downspouts Discharging Too Close to the Window Well

Gutters collect water from a relatively large roof area. During heavy rainfall, the resulting downspout flow can overwhelm a small window well.

Short downspout extensions, disconnected underground piping, clogged gutter outlets, and poorly selected discharge locations can concentrate runoff near a basement opening.

Rerouting the discharge may help, but the new outlet needs to direct water to an appropriate location without creating erosion, flooding, or drainage problems on neighboring property.

04

Heavy Rainfall and Saturated Soil

After prolonged rainfall, the surrounding ground may absorb additional water more slowly. Surface runoff increases, while underground drainage systems may receive more water than usual.

Under these conditions, water may reach the well from above, move laterally through nearby soil, or back up because the available outlet cannot discharge water fast enough.

Flooding during a major storm does not necessarily prove that a pipe is clogged. It may reveal insufficient capacity or an unsuitable discharge arrangement.

05

Leaves, Mulch, and Sediment Accumulation

Uncovered window wells may collect leaves, pine needles, grass clippings, mulch, and windblown soil.

As organic material breaks down, it may form a dense layer over gravel or drainage openings. Fine sediment can also migrate deeper into the drainage materials.

Recurring mud and mulch accumulation may indicate that surrounding runoff is washing landscape materials into the excavation. Removing surface debris alone will not correct that upstream source.

06

Damaged Window Well Walls and Connections

Metal window wells may corrode, while other retaining materials can develop displaced joints, cracks, or loosened connections.

Deterioration may allow water and soil to enter through the sides. It may also compromise the well's ability to retain the surrounding earth.

Bowed, loose, or unstable retaining walls deserve professional evaluation. Excavating beside a failing well or removing its walls can create soil-collapse hazards.

07

Deteriorating Basement Window Frames and Seals

Water may penetrate aging glazing seals, damaged window frames, deteriorated perimeter joints, or improperly installed window assemblies.

Leakage can become apparent when standing water reaches a vulnerable part of the installation.

However, damaged seals and inadequate drainage are separate conditions. A replacement window may correct a defective assembly, but it does not prevent water from accumulating in the surrounding well.

Early Warning Signs

How Do You Know a Basement Window Well Drain Is Failing?

Window well drainage problems often develop gradually. Recognizing changes in drainage performance can help homeowners investigate before water reaches finished basement materials.

Warning Sign Possible Explanation Recommended Response
Standing water after rain Restricted drainage or insufficient outlet capacity Document drainage time and inspect the system
Water reaching the window frame Severe accumulation or overwhelmed drainage Arrange prompt drainage evaluation
Mud and mulch inside the well Surface runoff transporting landscaping material Review soil grading and runoff paths
Rust or bowed retaining walls Corrosion, movement, or failing connections Evaluate retaining components and surrounding soil
Interior window staining Water intrusion, condensation, or another moisture source Trace moisture timing and entry location
Musty odor nearby Persistent dampness or wet materials Identify the moisture source and assess materials
Flooding only during intense storms Excess runoff or inadequate drainage capacity Inspect downspouts, grading, and discharge
!

What These Warning Signs Cannot Prove

Standing water does not automatically prove a drain is clogged. A leaking window does not necessarily mean the window itself is defective. Basement stains can also develop from separate moisture pathways. Accurate diagnosis should consider rainfall timing, exterior runoff, visible water levels, and the condition of the installed drainage system.

Troubleshooting Framework

How Can You Identify the Source of Window Well Flooding?

A useful investigation starts with observable evidence instead of immediately replacing drains, windows, or landscaping.

A

Rainfall Pattern

Determine whether flooding occurs after ordinary rain, prolonged wet weather, or intense storms.

B

Roof Runoff

Look for downspouts, overflowing gutters, and runoff entering from nearby roof drainage components.

C

Ground Slope

Identify low spots, settled backfill, raised landscaping, and surfaces that direct water toward the foundation.

D

Visible Drainage

Observe accessible drain openings, debris accumulation, and standing water without disturbing buried components.

E

Well Structure

Document corrosion, loose retaining walls, separated joints, and evidence of surrounding soil movement.

F

Interior Evidence

Record wet window frames, staining, flooring damage, and when moisture appears relative to rainfall.

Does Standing Water Always Mean the Drain Is Clogged?

No. Water may remain because the outlet is submerged, the surrounding soil cannot absorb additional water, the drainage network lacks sufficient capacity, or the original system has no effective discharge point.

A functioning inlet cannot overcome an inadequate outlet. For that reason, professional evaluation may need to extend beyond the visible well.

Why Does the Problem Return After Previous Repairs?

Recurring flooding often means that the original work corrected only one symptom.

Replacing a deteriorated window seal may reduce leakage temporarily while leaving water accumulating outside. Clearing a drain may temporarily restore flow, but new sediment can accumulate when runoff continues washing soil into the well.

The objective is to correct the complete drainage pathway rather than repeatedly removing water after every storm.

Safety Comes First

What Should You Do if a Basement Window Well Is Flooding Right Now?

If water rises toward the window during an active storm, preventing injuries is more important than attempting an immediate drainage repair.

Important Flooding Safety Warning

Do not enter a flooded window well, touch wet electrical equipment, open a window while water presses against it, or disturb unstable retaining walls. Keep children and pets away. If flooding reaches potentially energized equipment, avoid the affected area and contact the appropriate emergency or electrical professional.

Safer Immediate Actions

  • Observe conditions from safe ground.
  • Photograph visible water levels and runoff.
  • Keep people away from unstable soil and damaged glass.
  • Move unaffected belongings away from vulnerable areas when safe.
  • Contact qualified help when water continues rising or entering the home.

Actions to Avoid

  • Entering a deep or flooded window well.
  • Opening a basement window against accumulated water.
  • Digging beside unstable retaining walls.
  • Connecting drains to unidentified piping.
  • Pumping water directly back toward the foundation.

Temporary water removal may be appropriate in some situations, but pumping requires suitable equipment, electrical safety, and an acceptable discharge location. Water discharged toward the same foundation may simply recirculate.

Once immediate hazards have passed, the underlying drainage problem should be evaluated before relying on temporary measures as a permanent solution.

Visual Homeowner Guide

Basement Window Well Flooding: Causes, Warning Signs & Solutions

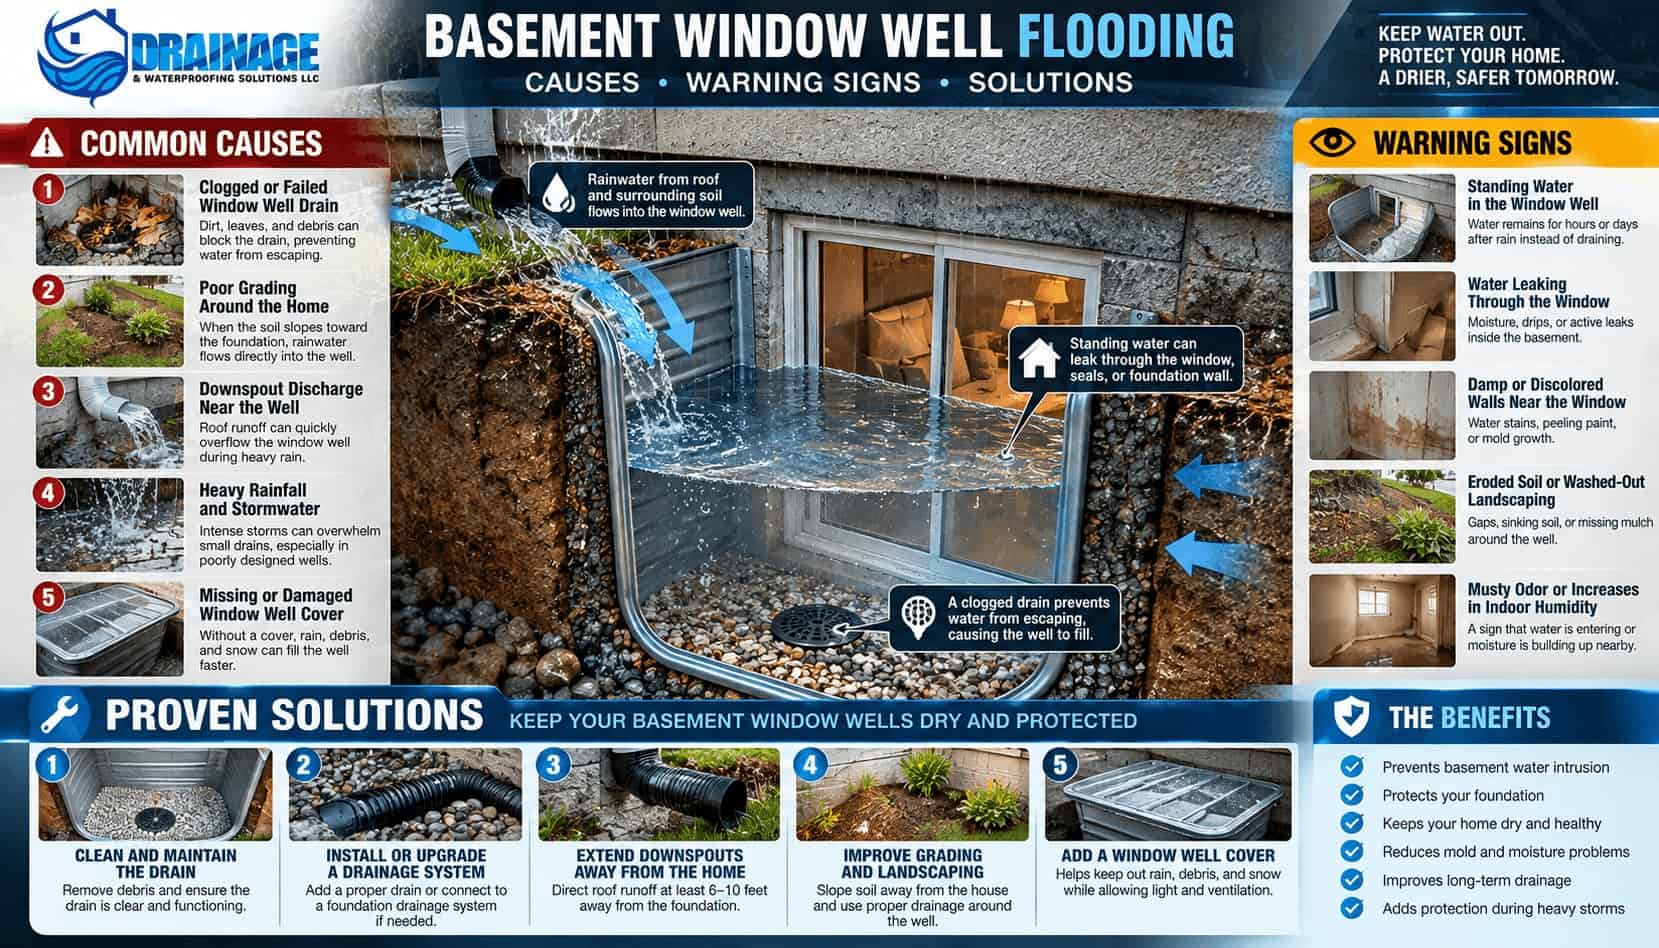
The following infographic illustrates how clogged drains, poor grading, roof runoff, and other conditions may cause water to collect beside a below-grade basement window.

Basement window well flooding infographic illustrating clogged drains, poor grading, roof runoff, warning signs and drainage repair options
Basement window well flooding: common causes, warning signs, and possible drainage solutions. Appropriate repairs depend on the property's conditions and installed drainage arrangement.
i

The Most Important Takeaway

Window well flooding is generally a water-management problem, not merely a window problem. Correcting excess runoff, maintaining effective drainage, and addressing damaged components together can provide a more dependable approach than relying on sealant or covers alone.

Repair and Prevention Options

What Are the Best Solutions for Basement Window Well Flooding?

The best repair depends on the verified failure. A drainage professional should consider incoming runoff, the well's condition, the available outlet, and how the proposed work may affect other drainage components.

Drain Cleaning

1. Restore Accessible Drainage

When leaves or other debris obstruct a visible inlet, safe maintenance may restore drainage. More extensive restrictions may require inspection beneath the gravel or inside buried piping.

Cleaning is effective only when the remaining system can discharge water. A damaged pipe, unsuitable outlet, or overwhelmed downstream network may require additional repair.

Drain Repair

2. Repair or Install a Proper Window Well Drain

Where the existing drainage arrangement has failed, repair may involve replacing damaged piping, correcting a connection, or establishing an appropriate outlet.

Drainage design should account for elevation, capacity, backflow potential, maintenance access, and applicable requirements. Connecting a new inlet to an overwhelmed foundation drain may create additional problems rather than resolving flooding.

Roof Runoff

3. Extend or Reroute Downspouts

Redirecting roof runoff away from a vulnerable window well may reduce the amount of water entering the area during storms.

Extensions and underground conveyance systems should carry water to an appropriate discharge location without causing erosion, nuisance drainage, or water returning toward another section of the foundation.

Grading

4. Correct Negative Landscape Grading

Surface grading improvements can redirect rainfall before it reaches a below-grade opening. Work may involve correcting settled soil, reshaping local drainage paths, or modifying landscaping that concentrates runoff.

Any grading changes should preserve building clearances, avoid obstructing windows or ventilation, and account for nearby walks, patios, and drainage routes.

Structure

5. Repair or Replace Damaged Window Well Walls

Corroded retaining walls, loose connections, displaced sections, and deteriorated materials may require repair or replacement.

Where soil movement is present, the retaining function should be evaluated before excavation. Deeper wells and emergency escape openings may also be subject to additional clearance, access, and cover requirements.

Window Repair

6. Repair Damaged Windows and Perimeter Joints

Damaged frames, glazing, or perimeter joints may allow water entry when the well fills. Appropriate repairs can address these specific weaknesses.

Window repairs should be coordinated with drainage corrections when water accumulation is also present. A new seal is not a substitute for controlling runoff and standing water outside the opening.

Which Repair Matches Each Problem?

Confirmed Problem Possible Solution What It Does Not Fix
Surface debris restriction Safe maintenance and drain inspection Broken buried piping
Failed underground drain Repair or replacement of affected components Excess surface runoff
Roof runoff directed into well Downspout rerouting Independent drain blockages
Ground slopes toward foundation Grading corrections Deteriorated window seals
Damaged retaining wall Well repair or replacement Inadequate drainage capacity
Defective window assembly Window or joint repair Recurring water accumulation

Broader foundation water-management problems may require evaluation beyond the window well. Learn more about foundation waterproofing , basement moisture control , and drainage system inspections .

Common Homeowner Question

Do Window Well Covers Prevent Basement Flooding?

A properly selected window well cover can reduce direct rainfall and debris entry, but it cannot guarantee a dry window well.

Water may still enter from surrounding soil, poor grading, concentrated runoff, or drainage backup beneath the cover.

What Covers Can Help With

  • Reducing falling leaves and debris
  • Limiting some direct precipitation
  • Reducing routine cleaning needs
  • Providing suitable protection when properly installed

What Covers Cannot Reliably Fix

  • Clogged underground drains
  • Negative grading around the foundation
  • Water moving through surrounding soil
  • Downstream drainage overload
  • Damaged window frames or foundation joints

Where a basement window serves as a required emergency escape and rescue opening, any cover must meet applicable requirements for opening and removal. A cover should never obstruct emergency escape.

Can Sealant Alone Waterproof a Basement Window Well?

Sealant may repair certain gaps or joints, but it cannot create a reliable drainage outlet. Applying sealant while allowing water to collect against a below-grade window may leave the underlying problem unresolved.

When leakage involves the frame or perimeter, the appropriate repair depends on the installation and condition of the materials. Drainage and window integrity should be evaluated separately when both are contributing factors.

Understanding Repair Scope

How Much Does Basement Window Well Drainage Repair Cost?

Window well drainage repair costs vary because the work may range from limited maintenance to underground piping replacement, excavation, structural repair, and landscaping restoration.

A reliable estimate depends on diagnosing the failure and determining how the proposed repair will discharge collected water.

01

Repair Complexity

Removing accessible debris is different from replacing damaged buried piping.

02

Window Well Depth

Deeper wells may require additional excavation, access, and safety precautions.

03

Soil Conditions

Saturated ground, unstable soil, and difficult access can affect repair scope.

04

Available Outlet

Establishing a suitable discharge route may require work beyond the window well.

05

Existing Damage

Corrosion, damaged windows, and deteriorated connections may require separate repairs.

06

Site Restoration

Landscaping, paving, and disturbed surfaces may need restoration after work.

Be cautious about universal repair prices provided without an inspection. An inexpensive repair may become costly if it treats only the visible symptom and flooding returns.

Ask contractors to explain the confirmed cause, the components included in the proposal, the intended discharge route, and any necessary ongoing maintenance.

Long-Term Moisture Protection

How Can Homeowners Prevent Window Well Flooding?

Routine inspection and maintenance can reduce debris accumulation and help identify changes in drainage performance before serious water intrusion occurs.

Seasonal Homeowner Checklist

Inspect Before and After Heavy Rain

CHECK 01 Keep Debris Out

Observe accessible wells for leaves, mulch, and sediment during dry conditions.

CHECK 02 Review Downspouts

Confirm roof runoff is not being directed into the window well.

CHECK 03 Watch Water Levels

Document unusual standing water following rainfall.

CHECK 04 Inspect Components

Look for deterioration, loose retaining walls, and damaged covers.

Before Heavy Rain

Check accessible drainage openings from a safe location and remove ordinary surface debris only when it can be done without entering a hazardous excavation.

Make sure downspouts are not directing water toward the opening and look for soil depressions, erosion, or landscaping changes that concentrate runoff near the foundation.

After Heavy Rain

Observe whether water drains normally or remains against the window. Photograph new staining, indoor leakage, and evidence that runoff has washed mulch or soil into the well.

Repeated changes in drainage performance deserve investigation even when no major interior damage has occurred.

After Landscaping or Exterior Construction

Review drainage patterns after installing patios, walkways, garden beds, retaining walls, or other features that affect surface runoff.

These changes can redirect water toward the foundation and create problems that were not present when the original drainage system was designed.

When Should You Schedule a Professional Inspection?

Schedule an evaluation when standing water repeatedly approaches the window, the drain appears ineffective, the well walls are deteriorating, or interior moisture develops.

Excavation, underground piping connections, and retaining-wall work should be evaluated by appropriately qualified professionals.

Local Drainage Considerations

Why Is Window Well Drainage Important in Raleigh and Central North Carolina?

Homes in Raleigh and surrounding Central North Carolina communities can experience heavy rainfall, seasonal storms, and extended periods of wet ground.

The effect on an individual home depends on its elevation, lot slope, soil characteristics, roof drainage arrangement, and the location of below-grade openings.

A basement window well beside a sloping driveway may receive substantially more concentrated runoff than one beneath a protected landscaped area. Similarly, a well next to a large roof downspout may face water volumes beyond what its size suggests.

Clay-rich soils can affect drainage in certain areas, but soil type alone does not determine which repair is appropriate. Surface grading, groundwater conditions, installed drainage, and discharge location must be considered together.

Drainage & Waterproofing Solutions LLC serves the Raleigh-Durham and Fayetteville-Southern Pines areas. The company's services include foundation waterproofing , basement moisture control , and drainage system inspections .

How Is Window Well Flooding Different From Other Basement Leaks?

Window well flooding involves water collecting around a specific below-grade opening. Water entering through a foundation crack, across a basement floor, or along the wall-floor joint may have a different source.

Those problems should not automatically be treated as window well failures. A focused diagnosis helps distinguish local surface-water accumulation from broader foundation moisture problems.

i

Evidence and Diagnostic Limitations

Visible water identifies where accumulation or leakage occurred, but it may not show where the problem originated. No photograph, odor, stain, or single rainfall observation can establish the condition of buried drainage piping. Reliable recommendations may require an on-site inspection and evaluation of the complete drainage pathway.

People Also Ask

Frequently Asked Questions About Basement Window Well Flooding

1. Why does my basement window well fill with water every time it rains?

A basement window well may repeatedly fill because the drain is blocked, surrounding soil directs runoff toward the house, or the outlet cannot remove water quickly enough. Nearby downspouts and saturated ground can contribute. Recurring flooding suggests a water-management problem, but it does not automatically prove that a pipe is clogged. Both the incoming water source and the drainage outlet should be evaluated.

2. Can a clogged window well drain flood my basement?

Yes. A clogged window well drain can allow water to rise against a below-grade window. When water reaches vulnerable glazing, frames, or perimeter joints, it may enter the basement and damage nearby materials. Restrictions can occur at the visible inlet or farther underground. Cleaning surface debris may help a minor blockage, but persistent flooding requires evaluation of the entire drainage route.

3. How long should water remain in a window well after rain?

There is no universal drainage time for every window well. Performance depends on rainfall intensity, soil saturation, the drainage arrangement, and its available outlet. However, recurring standing water against a basement window, indoor leakage, or noticeably slower drainage than before should prompt investigation. Temporary moisture within gravel is different from water rising high enough to threaten the window.

4. Will adding more gravel fix a flooded window well?

Adding gravel alone is not a dependable solution when water lacks an effective discharge route. Gravel can provide temporary storage and help water reach a functioning drain, but it cannot repair a clogged pipe, correct negative grading, or stop excessive roof runoff. The existing drainage arrangement and surrounding ground conditions should be evaluated before additional material is installed.

5. Do window well covers stop basement leaks?

Window well covers can reduce direct rainfall and debris entry, but they do not reliably prevent water entering from surrounding soil, poor grading, or drainage backup. A cover should complement an effective water-management system rather than replace it. Where the window is required for emergency escape, the cover must also comply with applicable opening and removal requirements.

6. Can I connect a window well drain to a foundation drain?

Some drainage designs allow window well connections to foundation drainage systems, but suitability depends on the existing configuration and applicable requirements. The receiving system must have adequate capacity, appropriate elevation, acceptable discharge, and protection against unwanted backflow. Connecting another inlet to an overwhelmed system may worsen flooding. A qualified professional should evaluate the connection before installation.

7. Why does water leak through my basement window during heavy rain?

Water may enter through a basement window when the surrounding well fills, the window assembly has deteriorated, or both problems occur together. Poor grading and concentrated roof runoff can increase water exposure. Diagnosis should include the exterior drainage pathway and the window's frame, glazing, and perimeter joints rather than assuming sealant alone will solve the problem.

8. Should I replace my basement window if the well floods?

Not necessarily. Window replacement may be appropriate when the frame, glazing, or installation has deteriorated. However, a new window does not correct an overflowing well, blocked drain, or poorly routed downspout. If water repeatedly accumulates, the exterior drainage problem should be evaluated even when the window also requires repair. Both conditions may need attention.

9. Is a flooded basement window well an emergency?

A flooded window well can become urgent when water enters the basement, reaches electrical equipment, presses against damaged glass, or is accompanied by unstable soil or retaining walls. Keep people away from hazardous areas and seek appropriate emergency assistance when necessary. Even when water recedes, recurring accumulation deserves investigation before another storm.

10. When should I contact a basement waterproofing professional?

Contact a drainage or waterproofing professional when a window well repeatedly fills, drainage performance changes, water reaches the basement window, or indoor moisture appears after rain. Professional evaluation is especially important when repair may require excavation, underground piping, or retaining-wall work. The objective is to identify the complete water source and discharge pathway.

Find the Root Cause

Need Help With Basement Window Well Flooding in Raleigh, NC?

If your basement window well repeatedly fills with water, correcting the visible symptom may not be enough.

A drainage evaluation can help identify whether surface runoff, downspouts, grading, underground piping, or damaged well components contribute to the problem.

Drainage & Waterproofing Solutions LLC provides drainage and waterproofing services for homeowners throughout its North Carolina service area.

Sources & Technical References

  1. U.S. Environmental Protection Agency
    A Brief Guide to Mold, Moisture and Your Home . Guidance on moisture control and damp building materials.
  2. University of Minnesota Extension
    Moisture in Basements: Causes and Solutions . Educational guidance on basement moisture sources and surface-water control.
  3. U.S. Department of Energy — Building America Solution Center
    Building America Solution Center . Technical resources covering building-envelope moisture management and foundation drainage.

Technical limitations: This guide provides general homeowner information and does not replace an on-site drainage assessment, structural evaluation, or applicable building-code review. Actual repair requirements depend on the property and installed system.

Professional Knowledge & Local Expertise

Reviewed by Drainage & Waterproofing Solutions Staff

Drainage & Waterproofing Solutions LLC provides drainage, foundation waterproofing, basement moisture control, and related water-management services for homeowners in North Carolina.

The company's service areas include Raleigh-Durham and Fayetteville-Southern Pines. Its published services focus on evaluating moisture problems and selecting drainage solutions appropriate to the property.

Learn More About Drainage & Waterproofing Solutions LLC

Posted in Basement Waterproofing, Drainage Solutions, Homeowner Tips

Basement Floor Seepage: Why Water Comes Up Through Cracks and What to Do

September 17th, 2026

Basement Water-Diagnosis Guide

Basement Floor Seepage: Why Water Comes Up Through Cracks and What to Do

Basement floor seepage often appears after sustained rain when water in the soil finds an opening through a slab crack, control joint, pipe penetration, sump area, or porous concrete. But groundwater is not the only possibility. A plumbing leak, drain backup, condensation, or water traveling from a wall can create a similar wet spot. The lasting solution begins by identifying the source and the route—not by sealing the first visible crack.

Raleigh & Central North Carolina Homeowner Guide

Quick Answer

If clear water appears through a basement floor crack during or after rain, subsurface moisture is a leading possibility. Saturated soil can increase water pressure beneath and beside the slab, while capillary action and vapor diffusion can move smaller amounts of moisture through concrete. First rule out plumbing, drain, appliance, and condensation sources. Then inspect roof runoff, grading, exterior pooling, foundation drainage, the sump system, and the exact entry point. Persistent basement floor seepage usually requires water management matched to the verified cause; paint, caulk, or a surface patch alone may simply move the symptom.

Is the Water Actually Coming Through the Basement Floor?

A puddle on the slab does not prove that water rose through it. Water can travel across a nearly level floor, run behind finished walls, follow a pipe, drip from a cold duct, leak from an appliance, or emerge from the joint at the foundation perimeter. Before diagnosing basement floor seepage, dry the area if it is safe, observe where moisture reappears first, and compare the timing with rain and household water use.

The distinction matters because each source belongs to a different repair path. Groundwater requires drainage and water-management analysis. A pressurized supply-line leak needs a plumber. A wastewater backup requires immediate sanitation precautions and the appropriate drain or sewer professional. Condensation calls for humidity and surface-temperature control. Treating all four as “waterproofing” wastes time and can conceal a more urgent problem.

What You ObservePossible SourceUseful CluesBest Next Step
Wet crack after rainSubsurface water using a slab openingClear water; storm-related; may recur in the same lineInspect the full exterior-to-interior water path
Water begins at the perimeterWall-floor joint or wall leakageFirst wetness at the cove joint, then flow across slabUse the separate wall-floor leakage diagnosis
One wet spot in dry weatherPlumbing, appliance, or condensate leakUnrelated to rain; near piping or equipmentHave the appropriate trade isolate the source
Moisture on broad cool surfacesCondensationHumid weather; pipes or objects may also sweatMeasure humidity and check for hidden seepage
Dirty or foul-smelling water at a drainDrain or sewer backupSlow fixtures, odor, solids, or rising drain waterAvoid contact and obtain urgent professional help

How Does Basement Floor Seepage Happen?

Concrete is durable, but an ordinary basement slab is not an unlimited waterproof barrier. Moisture can cross or bypass it in several ways. More than one mechanism may operate at the same house, which is why a damp-looking slab and an active stream of water should not receive the same diagnosis.

Liquid Water Flow

When soil beneath or beside the foundation becomes saturated, liquid water can follow cracks, joints, penetrations, gaps, drainage stone, or other connected openings. The visible exit may be far from the original exterior source.

Water Pressure

If water accumulates faster than it can drain, the pressure against below-grade materials rises. Professionals often call this hydrostatic pressure. It encourages water to use the weakest available pathway rather than proving that the concrete itself failed.

Capillary Movement

Tiny pores in concrete can draw moisture from damp material below. This can create darkening, mineral deposits, or persistent dampness without an obvious puddle or dramatic leak.

Vapor Diffusion

Water vapor can move through porous material when vapor conditions differ from one side to the other. A missing or ineffective sub-slab vapor retarder can matter, especially before moisture-sensitive flooring is installed.

Condensation

Warm, humid air can reach its dew point on a cool slab and leave surface moisture. Condensation forms on top of the floor; it does not rise through it, though both conditions can occur together.

Connected Water Paths

A crack, utility trench, pipe sleeve, abandoned drain, sump opening, and porous fill may form a connected route. The place you see water is an exit point—not necessarily the root cause.

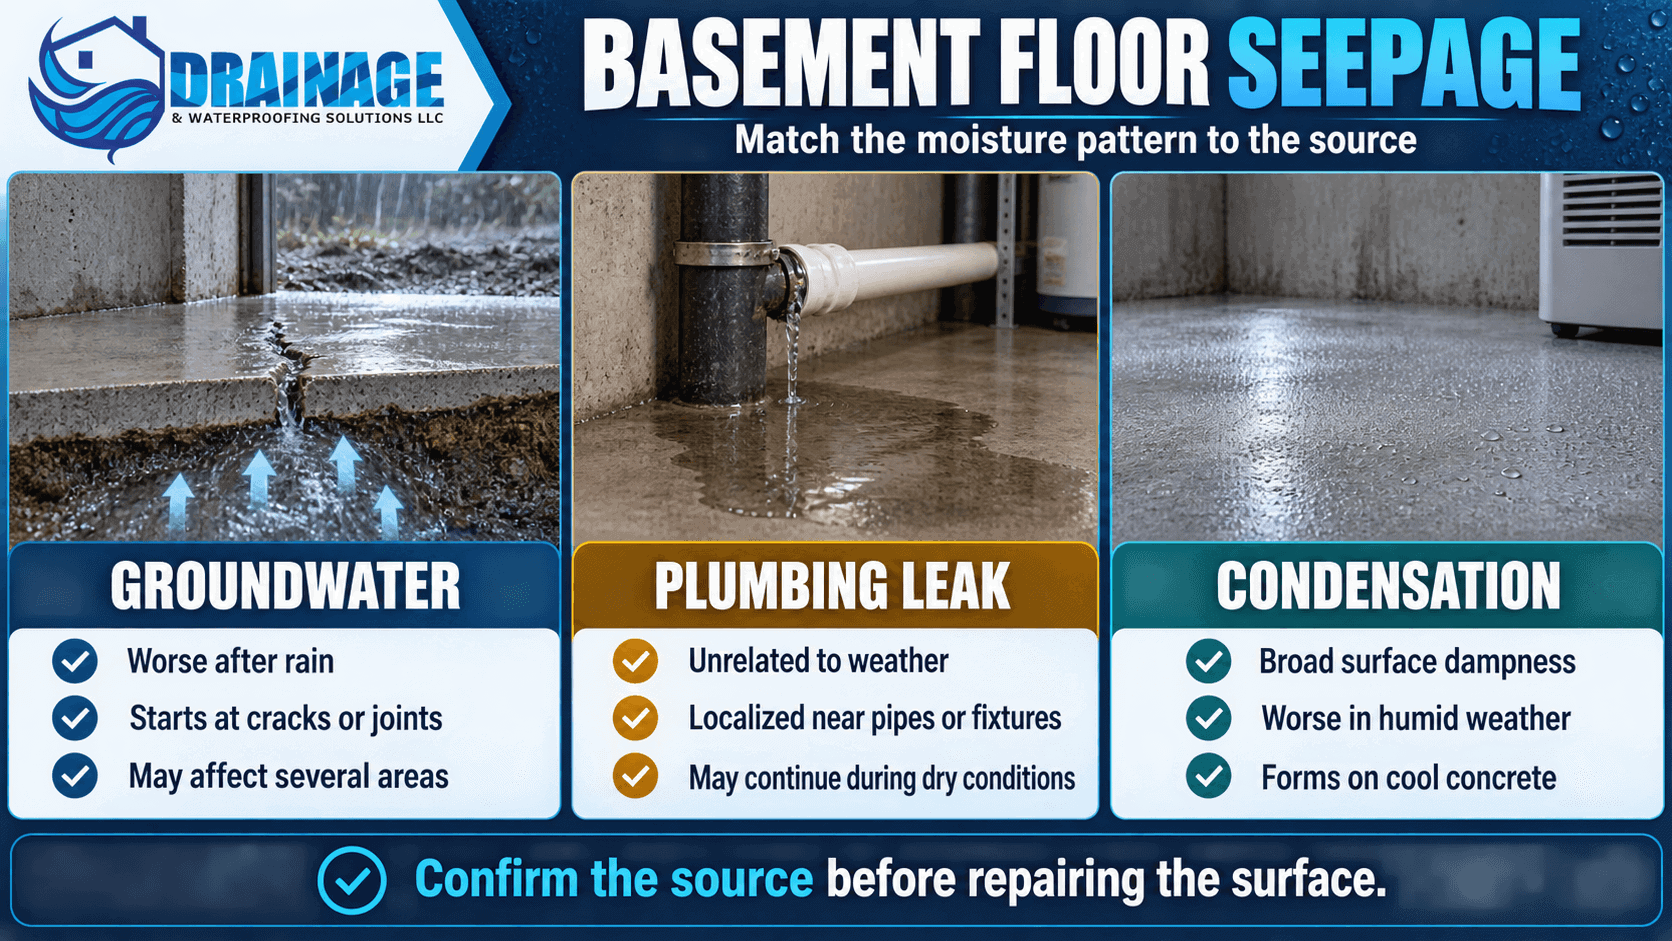
Basement floor seepage infographic comparing groundwater, plumbing leaks and condensation moisture patterns
Compare the common signs of groundwater seepage, plumbing leakage and condensation before selecting a basement floor repair.

Safety First: Water and Electricity Do Not Mix

Do not enter standing water if outlets, extension cords, appliances, service equipment, pumps, or other electrical components may be energized. Do not touch the electrical panel while standing on a wet floor. Keep children and pets away, and contact the appropriate emergency, electrical, utility, plumbing, or remediation professional when conditions are uncertain.

Treat foul-smelling or visibly contaminated water as a potential sewage exposure. If the slab is lifting, cracking rapidly, or accompanied by bowing or displaced foundation walls, stop cosmetic work and seek qualified structural evaluation.

What Does the Timing and Location Reveal?

Patterns narrow the investigation but do not prove a cause. Photograph the first wet point, mark its boundary with removable tape, and record recent rain, sump activity, plumbing use, indoor humidity, and exterior pooling. The most useful observation is often where the water begins—not where the puddle ends.

PatternWhat It May SuggestInspection Priority
Only after prolonged or heavy rainSurface runoff, saturated soil, limited drainage, or elevated groundwaterRoof water, grade, outlets, foundation drainage, sump
Continues after rain stopsStored water in soil is draining slowly toward or beneath the houseSite drainage and subsurface water movement
Always at one crackA preferential route through the slab; pressure source may remain elsewhereCrack condition plus water beneath the slab
Around a pipe penetrationOpening around the sleeve, pipe condensation, or plumbing leakDetermine whether water is outside or inside the pipe
Under flooring, not on exposed slabVapor movement, trapped seepage, adhesive failure, or another leakMoisture testing before replacement
Unrelated to weatherPlumbing, condensate, appliance, drain, or year-round subsurface sourceRule out active building systems first

Root-Cause Checklist

Eight Common Causes of Basement Floor Seepage

1. Roof Runoff Concentrated Near the Foundation

A large roof delivers substantial water during a storm. Overflowing gutters, disconnected downspouts, short extensions, eroded outlets, and buried drains that are blocked or broken can release that water beside the foundation. It may then move downward and appear as basement floor seepage.

2. Negative Grade or Exterior Ponding

Settled backfill, low planting beds, patios, walkways, driveways, and landscape edging can direct water toward the house. A visible puddle is not required; slowly infiltrating water can still load the soil beside the footing.

3. Saturated Soil or a Seasonally High Water Table

Long rain events can fill pore spaces in the soil and reduce its ability to accept more water. The resulting pressure and water movement may expose weak points in the slab or existing drainage system. This can affect structurally sound homes as well as homes with cracks.

4. Missing, Clogged, Damaged, or Overwhelmed Foundation Drainage

A footing drain or interior perimeter system must collect water, convey it without obstruction, and reach a working outlet or sump. A failure anywhere in that chain can allow water to build beneath or beside the slab.

5. Slab Cracks, Joints, and Penetrations

Concrete commonly develops shrinkage cracks, and construction creates joints and penetrations. These openings may be harmless when dry yet become water routes when conditions beneath the floor change. Sealing the route without controlling the water may cause a new leak nearby.

6. Sump-Pump or Discharge Problems

A failed pump, stuck switch, power outage, undersized system, blocked inlet, missing backup, frozen or obstructed discharge, or outlet that sends water back toward the foundation can permit the water level beneath the slab to rise.

7. Sub-Slab Plumbing or Drain Failure

A supply, waste, or condensate line beneath or near the slab can leak independently of rain. Location, temperature, odor, meter behavior, fixture use, and professional testing help distinguish plumbing water from groundwater.

8. Vapor Movement or Condensation Misidentified as Seepage

A floor can feel damp or damage a covering without carrying visible liquid through a crack. Moisture testing and humidity observations are important before installing carpet, luxury vinyl, wood, epoxy, or another low-permeance finish.

Safe Checks Homeowners Can Make Before an Inspection

Observation is valuable; destructive testing is not required. If the area is electrically safe and the water is not contaminated, document conditions before moving belongings or changing the surface.

  1. Find the first wet point. Dry a small observation area and watch the crack, penetration, wall edge, floor drain, pipe, appliance, and ceiling above it.
  2. Record timing. Note when rain began, when moisture appeared, how long it continued, and whether it repeats after similar storms.
  3. Inspect from safe exterior ground. Look for gutter overflow, leaking elbows, disconnected pipes, erosion, ponding, low spots, and hard surfaces that tilt toward the house.
  4. Observe the sump. Without bypassing guards or touching energized equipment, note whether the pump activates, whether the water level falls, and where discharge water goes.
  5. Check plumbing context. Note nearby bathrooms, laundry, water heaters, HVAC drains, supply lines, and floor drains. A licensed plumber may need to perform isolation or pressure tests.
  6. Measure relative humidity. A hygrometer can show whether humid indoor air may contribute, though it cannot rule out seepage below the slab.
  7. Protect evidence. Photograph staining, mineral residue, lifted flooring, crack width, and water lines before cleaning or patching.
  8. Move vulnerable items. Relocate cardboard, fabric, wood furniture, electronics, and stored contents to a dry area rather than setting them directly on the slab.

What a Professional Basement-Water Inspection Should Evaluate

A useful inspection follows water as a system. It should not begin and end with the wet crack. Site layout, roof discharge, surface flow, foundation type, slab condition, existing drainage, sump performance, outlet elevation, moisture pattern, and possible building-system leaks all affect the recommendation.

Exterior Inputs

Roof area, gutters, downspouts, buried conveyance, grading, patios, walkways, retaining features, neighboring runoff, low areas, erosion, and available outlets.

Foundation Pathways

Slab cracks, control joints, penetrations, perimeter joints, wall cracks, masonry conditions, patches, coatings, previous repairs, and locations concealed by finishes.

Drainage Performance

Presence and apparent condition of foundation drains, accessible cleanouts, sump pit, pump, check valve, alarms, backup provisions, discharge routing, and evidence of recirculation.

Competing Sources

Plumbing, wastewater, condensate, appliances, humid air, roof leaks, wall seepage, window wells, and water traveling behind finished assemblies.

Which Solutions Actually Address Basement Floor Seepage?

The right plan controls the verified source, creates a reliable path for water, protects the structure and interior, and reaches a suitable discharge point. It may combine low-cost exterior corrections with subsurface drainage. It should also distinguish liquid entry from vapor transmission before floor finishes are selected.

Verified ConditionPotential ResponseImportant Limitation
Roof water released at foundationRepair conveyance and route discharge to a suitable locationDo not send water toward neighbors, septic areas, or back toward the house
Negative grading or pondingCorrect surface flow, settlement, swales, or site drainage as appropriateUtilities, siding clearance, entrances, and outlet elevation constrain work
Persistent water beneath slabEvaluate interior or exterior foundation drainage connected to reliable dischargeSystem design depends on foundation, soil, layout, and destination
Sump cannot keep up or dischargeCorrect pump, inlet, power, backup, pipe, outlet, or capacity issueA larger pump alone does not fix blocked drainage or recirculation
Isolated nonmoving crack with controlled waterA compatible crack-repair system may be part of the planRepair material cannot relieve ongoing water pressure or structural movement
Vapor transmission through slabProfessional moisture testing and a compatible flooring/vapor-control assemblyA vapor product is not a solution for active liquid leakage
Plumbing or drain failureRepair and test the affected building system; dry and remediate materialsDrainage work cannot substitute for plumbing or sewer repair

Why Paint, Caulk, and Quick Patches Often Fail

A surface product may be useful only after the cause, substrate condition, moisture load, and repair objective are understood. If water continues accumulating below the floor, plugging one opening can increase pressure at the patch or redirect water to another crack, joint, or penetration. A coating can also trap visible evidence until adhesion fails.

Likewise, a dehumidifier manages water vapor in the air; it does not intercept liquid water below the slab. It can support a dry-basement plan after leaks are controlled, but it should not be presented as a cure for basement floor seepage.

A durable repair answers four questions: Where is the water coming from? How does it reach the slab? Where will it be collected? Where can it discharge safely?

Why Raleigh-Area Homes Need a Whole-Property Diagnosis

Central North Carolina properties vary widely in elevation, grading, soil behavior, lot drainage, foundation design, additions, landscaping, and stormwater outlets. Intense rainfall can expose a weak link that remains invisible during dry weather. Water may arrive from the roof, an uphill yard, a hard surface, a neighboring drainage pattern, saturated soil, or a building-system leak.

That is why basement floor seepage should be assessed in context. A crack may be the visible exit, while the actual cause is a disconnected downspout, settled grade, failed footing drain, underperforming sump, obstructed discharge line, or water redirected by later landscaping. Conversely, a wet spot that appears without rain may have nothing to do with exterior drainage.

Drainage & Waterproofing Solutions can connect drainage-system inspection, basement moisture control, and foundation waterproofing when the evidence shows those services belong in the same plan.

Evidence and Limits

What Does a Wet Basement Floor Prove?

A wet floor proves that water reached the visible surface. It does not, by itself, prove groundwater, hydrostatic pressure, structural failure, a plumbing leak, or the need for a particular system. Even water sitting directly on a crack may have traveled across the surface from the wall or from above.

Responsible diagnosis combines the first wet location with weather history, exterior drainage, plumbing context, sump behavior, material condition, moisture measurements, and repeat observations. Some concealed conditions cannot be confirmed without specialized testing or limited access.

It Does Not Prove Foundation Failure

Many water-entry problems occur in foundations without structural failure. Floor heaving, displacement, widening cracks, bowing walls, or other movement are separate signs that may require an engineer.

It Does Not Select One System

Exterior water management, foundation drainage, sump work, crack repair, vapor control, plumbing repair, and humidity control solve different problems. The visible puddle cannot choose among them.

It Does Not Justify Covering the Floor

Installing flooring over unresolved moisture can trap water, damage adhesives and finishes, and conceal recurrence. Diagnose and control moisture before finishing the basement.

How Can You Reduce the Chance of Basement Floor Seepage Returning?

Maintain Roof-Water Conveyance

Inspect gutters, downspouts, connections, and outlets during rain. A pipe that looks intact in dry weather may leak, overflow, or discharge beside the house under storm flow.

Protect Positive Surface Drainage

Watch for settled soil, mulch dams, eroded swales, sunken pavers, new planting beds, and hard surfaces that change the route of runoff toward the foundation.

Test Installed Equipment

Follow manufacturer and professional guidance for sump pumps, alarms, backup power, check valves, drains, and discharge lines. Observe the complete cycle and outlet, not just motor noise.

Keep the Slab Observable

Do not permanently cover a recurring wet area before diagnosis. Use raised, moisture-resistant storage practices and retain access to cracks, drains, sumps, and perimeter conditions.

Control Humidity After Leakage Is Addressed

Monitor relative humidity and operate correctly sized equipment as needed. Humidity control protects materials but does not replace liquid-water management.

Recheck After Major Storms

Inspect the same locations after heavy or long-duration rain. Early staining, mineral residue, pump changes, or damp edges may reveal a developing problem before a large puddle forms.

When Should You Call for Help?

Request prompt help for standing water near electrical equipment, sewage or drain backup, rapid inflow, a pump that cannot lower the water, suspected active plumbing leakage, or slab and wall movement. Schedule a drainage and waterproofing evaluation when basement floor seepage repeats after rain, spreads to multiple cracks, damages finishes, continues after exterior maintenance, or returns after a surface patch.

Bring photographs and a simple timeline. Knowing the rain conditions, first wet point, duration, sump behavior, and recent property changes can make the inspection more productive.

People Also Ask

Frequently Asked Questions

Why is water coming up through my basement floor after rain?

Rain can saturate soil around and beneath the foundation faster than the property’s surface and subsurface drainage can carry it away. Water then follows available cracks, joints, penetrations, or porous material. Check roof discharge, grading, exterior pooling, foundation drainage, sump performance, and the exact first wet point.

Can water really pass through solid concrete?

Concrete contains pores and often has cracks, joints, and penetrations. Liquid water can use connected openings, while smaller amounts of moisture can move by capillary action or vapor diffusion. The mechanism matters because active liquid entry and vapor transmission require different responses.

Does basement floor seepage mean my foundation is failing?

Not by itself. Many basement water problems are drainage or moisture-management issues rather than structural failures. However, floor heaving, offset slab sections, widening cracks, bowing walls, or other movement should be evaluated by an appropriately qualified structural professional.

Will sealing a floor crack stop the water?

It may seal one route if the crack is suitable and the underlying water condition is controlled. If water remains beneath the slab, pressure can challenge the repair or move the leak to another opening. Diagnose and manage the water source before treating the crack as an isolated defect.

Will waterproof paint stop water coming through a basement floor?

A coating may reduce limited surface moisture when the substrate and product are appropriate, but it is not a substitute for managing active water beneath the slab. Pressure, poor adhesion, salts, or ongoing wetting can make coatings blister, peel, or redirect the visible leak.

Can a dehumidifier fix basement floor seepage?

No. A dehumidifier removes water vapor from indoor air. It can help control humidity after liquid entry is corrected, but it cannot intercept groundwater, repair plumbing, clear a drain, restore grading, or provide a path for water below the slab.

How can I tell groundwater from a plumbing leak?

Groundwater-related leakage commonly tracks rain or seasonal wet conditions and may affect cracks, joints, or several areas. Plumbing water may appear regardless of weather and relate to fixture use, equipment, pressure, temperature, odor, or meter behavior. Do not rely on one clue; a plumber may need to isolate and test the system.

Is water at the wall-floor joint the same problem?

Not necessarily. Water may enter at the cove joint where the wall and floor meet, then spread across the slab and resemble floor seepage. Observe where wetness begins. See the dedicated guide to water leaking where the basement wall meets the floor for that specific pathway.

Can I install flooring after the basement looks dry?

A dry appearance on one day is not enough. Moisture can be seasonal, storm-dependent, or present as vapor without a visible puddle. Resolve known leakage and use appropriate professional moisture testing and flooring specifications before installing moisture-sensitive finishes.

Who should inspect basement floor seepage in Raleigh, NC?

A drainage and waterproofing professional can evaluate runoff, grading, foundation pathways, drainage, sump equipment, and discharge. Use a licensed plumber for suspected supply, waste, or appliance leaks, and an engineer when heaving, displacement, or significant structural movement is present.

Find the Water Path

Request a Basement Drainage and Moisture Evaluation

If water returns through a floor crack, appears after storms, overwhelms the sump, or damages basement finishes, diagnose the full route before covering or patching the evidence.

Drainage & Waterproofing Solutions, LLC serves Raleigh and surrounding Central North Carolina communities with drainage inspection, basement moisture control, foundation waterproofing, and related water-management services.

Call (919) 508-7503
Contact the Team

Related Drainage and Basement Resources

Authoritative References

This guide uses established building-moisture principles and is educational, not a site-specific diagnosis.

Posted in Basement Waterproofing, Drainage Solutions